Archive for Tutorial

Say Hello to Ruby on Rails

I am writing this tutorial with the assumption that you have already installed Ruby on Rails on your computer. Installing Ruby on Rails isn’t exactly the easiest process if you are inexperienced with command-line interfaces, like I am, but I found Lynda’s Essential Ruby on Rails Training to be a huge help.

Before we get started with the Hello World app, you need to install a text editor such as E Text Editor which is available from http://www.e-texteditor.com/ This is just a good tool for editing web pages and great for working with Ruby on Rails. If you’re on a Mac, TextMate is the original inspiration for this program.

Step 1:

First of all you’re going to need to launch Command Prompt from Start > Programs > Accessories > Command Prompt.

Once you have Command Prompt open, navigate to your Ruby on Rails directory (most likely to be C:\Ruby unless you specified otherwise during installation) by typing:

cd c:\ruby

OK, so if your screen command prompt now starts with “C:\Ruby” we can now move on to creating the project.

To create your first project (or any new project for that matter) you need to alter your command line to read:

C:\Ruby rails my_app

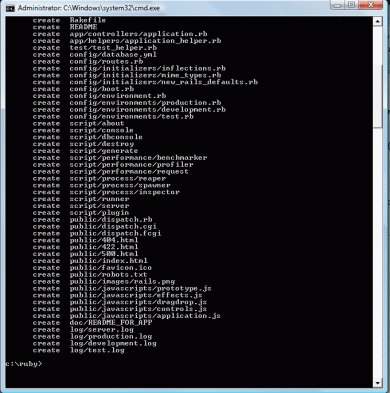
This will tell Rails to create a new set of project files as below:

Rails has now created a series of directories and files in your Ruby directory that will be the basis for your application.

Step 2:

The next step is to launch our server. Currently, the web server that ships with Rails is Mongrel.

What we’re going to do now is run a script. You can view the scripts in your project by going to C:\Ruby\my_app\Scripts but as you might guess, the one we are concerned with at the moment is ‘Server’.

To start the server we need to first go to our project directory by typing:

cd my_app

Now we’re in our project folder we can run our server by typing:

ruby script/server

If you see something like the screen adobe, your web server should be up and running. However, just to test this, we need to open our browser and enter:

http://localhost:3000

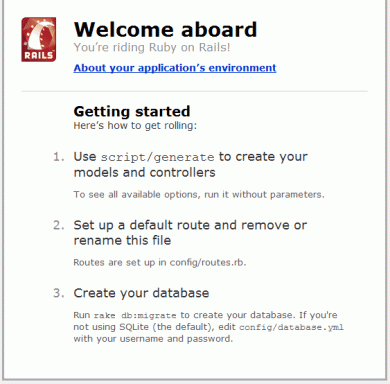
Hopefully you should see a page like the one below:

If not, just go back and make sure you followed the previous steps correctly.

Step 3:

So, working from the project we generated earlier on in step 1, we are now going to create a controller. The controller is what will be responsible for the actions we request from our application.

To generate a controller, all we need to do is run another script from our scripts directory that we saw earlier. To do this, open another Command Prompt window so as not to interrupt the web server we already have running. Make sure you are in our project folder and alter the command line to read:

C:\Ruby\my_app\ruby script\generate controller Say

If you did this correctly, you should see the following:

What we are doing here is telling RUBY to use the script GENERATE to generate a CONTROLLER called “Say”. As you can see, the script has also created other files, but we’ll worry about those later.

Step 4:

Once we’ve created the controller, we now need to open-up E Text Editor. We can do this from the command line by adding the following line to c:\ruby\my_app in Command Prompt:

e app\controllers\say_controller.rb

You should now see the contents of say_controller.rb in E, and we can go on to edit this to serve some kind of function:

After adding

def hello
end

We can go on to add a VIEW to this controller. A view is exactly what you might think it is. It is the front end of what the user will see and interact with. So what we are going to do now is create a view that we can display in a browser.

The GENERATE script has already created a folder for us within VIEWS, so all we need to do is create the RHTML file. This particular extension is practically the same as HTML, but the ‘R’ at the beginning of the extension implies that the file will include some elements of Ruby on Rails.

The extension .rb as you might guess belongs to Ruby. It implies that the content of the file is PURE Ruby, whereas files such as RHTML only include SOME Ruby.

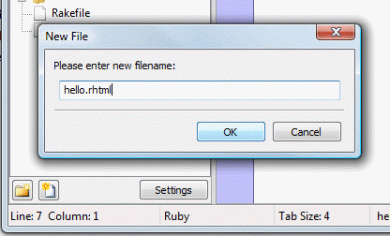
Click the new file button in the lower-right of your E window and name the file hello.rhtml

We can now edit this view file as we would a normal HTML file. Enter the following (or something similar) into your currently blank hello.rhtml file:

<html>

                <head>

                                <title>Hello World</title>

                </head>

                <body>

                                <p>Hello World!</p>

                </body>

</html>

…and save it.

Now, before we try and view it in our browser we need to restart Mongrel (our web server) by returning to the first Command Prompt window that is running the server and pressing Ctrl+C and then re-launching the server by entering:

ruby script\server

This is necessary in this case to let us view the changes we have made.

Now we can open our browser and go to the address:

http://localhost:3000/say/hello

You should be seeing ‘Hello world!’ in your browser window.

Conclusion

This was a starting block on your way to learning Ruby on Rails and up to now you have learnt how to make a static web page. Of course, RoR is not just for making static web pages, but web applications. This was just a very basic introduction to the framework.
Use CSS to Style Columns

So why would you want to style your list items as columns? Well, good question! Let me just give you a few examples: If you like me are designing a layout for a WordPress blog that has a LOT of categories, you might not want that list to go way off your page. Other blogs might have the same problem with their blogroll, your blogroll grow over time and at some point it will get longer than you might like and split it up in two columns.

But the same technique that is used in this example can also be applied to navigation. You can use this method to create a horizontal navigation bar, and if you have many links, you can have the links align nicely underneath each other.

OK, you probably want to get going, it’s very simple and easy. Actually we are only really using a few basic CSS properties and I will go over them in detail in this article.

Just an aside here before you start coding your CSS; a good practice before you start coding is to reset all the known default browser style. These differ a lot from IE6/7 to Firefox to Opera, Safari etc. Eric Meyer has taken the time to develop a stylesheet that will do just that for you, just grab a copy of the file, and use the ‘@import’ command at the begging of your CSS stylesheet to import the file.

Let’s start out with our markup then, a simple list you can get here. It’s just a simple list of the categories on this site.

  1. First thing we want to do is set a width of our container and centre it. You don’t have to if you are doing this in your sidebar, just set the width.
  2. #categories {
    width: 980px;
    margin: 10px auto 0;
    }

  3. Next thing is to set the list-item elements to actually make the colums. We float each single list item that will make every category ‘jump’ up to the right of its preceder. We will also give it a width of 136px (this is essentially the width of the coloumn), and push the columns a bit apart by giving them a right matgin of 3px.
  4. #categories li {
    float: left;
    width: 136px;
    margin-right: 3px;
    }

Well that’s basically it, we now have a set of columns, but to make them visually appear better we will do some extra styling.

  1. Give the line a height of 1.7em
  2. #categories ul {
    line-height: 1.7em;
    padding:0 0 0 5px;
    }

  3. Make the font a bit smaller, capitalize the words and make it bold.
  4. #categories li {
    font-size:11px;
    text-transform: capitalize;
    font-weight: bold;
    }

  5. Finally style the links and give them a hover style.
  6. #categories li a {
    color: #000;
    text-decoration: none;
    }
    #categories li a:hover {
    color: #999;
    text-decoration: none;
    }

You can suit the final styling to your individual needs; you can also make the columns wider or narrower if that’s what you want. If you are making it in a sidebar you will probably only want to have 2 columns, if you are styling a navigation bar, you might want to have more.

If you are interested you can download the full stylesheet and compare it to your own.

/Kasper – on Twitter and Delicious

Skills Gap

 Whilst I have played a little bit with Flash before, I have not had a great deal of experience doing anything beyond the basics. I am more familiar with the DVD creation portion of my project having used both Ulead DVD Workshop and Adobe Encore to create a number of DVDs for a variety of purposes. I therefore need to re familiarise myself with Flash and expand my knowledge and skills in this area. Luckily there seems to be a wealth of information and tutorial both freely available on-line and commercially in print. I have purchased Teach Yourself: Flash 8 by Mac Bride to help me to get to grips with the application. I also own Flash 8, so I will be able to go through both the tutorials in the book and on line to enhance my Flash skills that I will need to successfully complete my product. On the Internet there is a wide-range of different tutorials covering various aspects of Flash from a basic introduction to the user interface, but also tutorial focusing on very specific tasks within the program such as 3D Logo Animation.


First Steps Towards the WP Theme

As I mentioned in my last blog post, I would have liked to talk to Justin before starting out on my WordPress theme adventure. I did try to get in touch with him, but he is a busy man and has not had the time to get back to me. Hopefully I will be able to talk to him a bit later on in the process. So when I couldn’t get in touch with an expert I had to figure out the answers to my questions on my own.

Where to start?

WordPress for starters, is basically a publishing platform normally associated with blogging. In order to understand how a Theme works, you can say that a WordPress blog consists of two separate things: The content; text, images, videos etc. and The design; header image, background, link colour etc. the design is what we call a theme. The theme is totally separate from the content, that’s why you can change the look and feel of you blog without changing the content.

This is what WordPress says about Themes

“Fundamentally, the WordPress Theme system is a way to “skin” your weblog. Yet, it is more than just a “skin.” Skinning your site implies that only the design is changed. WordPress Themes can provide much more control over the look and presentation of the material on your website.”

Before getting into all the advanced stuff with coding and all that, you need to know what kind of theme you want to design. Most themes are pretty generic in the sense that they fit many wordpress blogs. When creating a theme think about in what context it is going to be used, do you want it to be used on many blogs, or is it for one particular blog. My theme will specifically be targeted at this blog, this means that it will probably include elements that will only have relevance to this blog and it’s content.

What you need!

Even though a WordPress Theme is only about presentation you still need the full WordPress blog to fully develop your theme. As WordPress is a CMS that runs on a server, you will need to install one on your personal computer. I will not go into too much detail about this, people that want to create WordPress themes, would be familiar with installing WordPress either on a local server or remote.

Cre8te-design has a pretty useful list for what you need when stepping into the world if WordPress Themes. If you are familiar with the concepts and software mentioned here, you should have no worries in attempting to create your own theme.

Templates…

Are basically what you will be working with throughout the process, you will not modify any WordPress files, you will only work with you own template files. That is why your theme can be used with any Wordpres blog out there. You can download templates from the official WordPress Theme Directory. This will give you an idea of what is about and what you will be working with. It is also a good place to get inspiration for new themes.

Also follow my progress on Twitter and Delicious

/Kasper

MySQL

Learning MySQL/*First what needs to be done is to create a database for users to store the table; in order to do this enter*/CREATE DATABASE (database name);/*example CREATE DATABASE members;*//*next is to create a table within the database, to do this select the database you wish to use, for example ‘members’ typing ‘USE members’ into MySQL. Then type*/CREATE TABLE `members` /*to create a table called MEMBERS*/(
`id` int(4) NOT NULL auto_increment, /*sets up the classification and

`username` varchar(65) NOT NULL default ”, /*setting up the username variable and allowing a maximum of 65 characters*/

`password` varchar(65) NOT NULL default ”, /*setting up the password variable and allowing a maximum of 65 characters*/

PRIMARY KEY (`id`) /*ordering of the table by listing them in the order they sign up for the website, in this case by ID NUMBER*/
) TYPE=MyISAM AUTO_INCREMENT=2 ; /*not to sure what this does however in my case the coding didn’t work*/

— Dumping data for table `members`
INSERT INTO `members` VALUES (1, ‘john’, ‘1234’); /*this is setting up the user data into the table*/ ALTERNATIVE CODING THAT DOES WORK FOR MYSELFCREATE DATABASE members;USE members;CREATE TABLE tblUsers(
UserID INT NOT NULL AUTO_INCREMENT PRIMARY KEY,
/*alternative to PRIMARY KEY(id) as labelled above*/
UserName VARCHAR(65),
UserPassword VARCHAR(25),
UserEmail VARCHAR(255));
All MySQL Coding is like actionscript in the sense that it is in between the (   ) brackets instead of {  } that actionscript usesINSERT INTO tblUsers (UserName, UserPassword, UserEmail) VALUES(‘Marc’,’1234’,’marctaylor6631@googlemail.com’);

More Tutorial Websites>!

http://www.freewebmasterhelp.com/tutorials/phpmysql


Offers users tutorials in a structures order of setting up the basics of php

 Here is a list of things PHP and MySql can do with one another, and the website offers advice on creating.

  • Banner Rotation. On this site, where each banner is, a PHP script is called. This opens a database and picks a random banner from it to show the visitor. It also counts the number of times the banner has been viewed and could, with a few changes, track clicks too. To add, change or edit the banners all I have to do is change the database and the script will pick the correct banners for all the pages on the site.
  • Forums. Hundreds of forums (message boards) on the internet are run using PHP and MySQL. These are much more efficent than other systems that create a page for each message and offer a wide variety of options. All the pages in the forum can be updated by changing one script.
  • Databases. One quite obvious example is sites which get all there information from a database. For example Script Avenue is run by a few scripts, which gain all their information from a large database. All the different script categories can be accessed in one script by just changing the URL to access a different part of the database.
  • Websites. If you have a large website and you want to change the design it can take a very long time to update and upload all the pages. With PHP and MySQL your whole website could be just one or two PHP scripts. These would access a MySQL database to get the information for the pages. To update the website’s design you would just have to change one page.

 ———————- Websites such as http://www.maketemplate.com/menu/ offer scripts for PHP CSS and HTML coding, giving you step by step instructions, like in this case an include menu template.

————————http://www.php-mysql-tutorial.com/ offers users the ability to work step by step of setting up PHP, and MySql with links to resource pages, Links to useful books, a question and answer page, PHP jobs currently in the market, tutorials (for example a gallery which will come in useful, CMS creation) and how to find php hosting web space. The tutorials are straight forward and I recommend this website to everyone who is starting to look into PHP web design.

————– http://devzone.zend.com/node/view/id/627 is also good as it goes from very basic PHP stuff however offers comment systems in which users can provide help with the tutorials and since PHP is open source, allow for their own personal updates/ customisations to the tutorials

————–http://www.tizag.com/mysqlTutorial/ offers downloadable PHP MySql PDF’s to help in the development, however again covers basic coding.

http://www.tutorialstoday.com/Programming/PHP.aspx offers 28 pages of PHP tutorials so if you cant find what you want here then you probably cant anywhere.

http://www.youtube.com/watch?v=BRd4xguBX6A and the linking pages on the right offer video tutorials of php basics, which are useful as not always text is straightforward to read. Linking pages include http://www.youtube.com/watch?v=Txj4mj5yom0 – covering the basics
http://www.youtube.com/watch?v=7JmSf9JfQjY- login pages
http://www.youtube.com/watch?v=7_G6Uh8saFk- login pages 2
http://www.youtube.com/watch?v=8JRICTFnViM- user login and cookies as well as a video http://www.youtube.com/watch?v=ZLvb-nAb7H4 showing how to hack Php Email which is useful because we can see how vulnerable PHP is to hackers. This video hacks into users emails in which you can read or forward users emails.

PHP Resources

Below is a list of PHP resources I have accumulated which have helped me in my understanding of PHP, and hopefully will help anybody else who wishes to pursue this area. Some of these resources are websites, and some are books. I will update the list as I find more tutorials and useful information.

PHP 5 in easy steps, by Mike McGrath – A good starting point, as mentioned in another post.

http://php.resourceindex.com/ – A portal site which gives links to hundreds of useful tutorials. Perhaps more useful to someone who has a basic knowledge of PHP, as I have found that beginners tutorials are often somewhat confusing.

http://www.phpbuilder.com/ – Another useful site for finding tutorials, with a good search facility leading to many helpful tutorials.

http://evolt.org/article/comment/17/60265/index.html – A great tutorial for a PHP login section with Remember Me features. Remember Me is a good feature to have on a login area and makes the users experience more enjoyable and easier. A more advanced tutorial.