Archive for October, 2008

3 is the magic number

Well, 3 is the number of students that actually turned up for todays class.  We all gave our draft pitches and listened to feedback given from the other 2 students and also from Scott.  Scott raised some good points for me that I had not considered before, and I now know that I will need to look into how to use PHP as the aspects of the website that I am going to recode for my web app use PHP.  This will hopefully not prove to be too much of a problem and Scott also mentioned that he has a book that would prove useful to me.

In the next week I will be writting my detailed proposal for my web app which I will be creating during weeks 6 to 12 for the second assignment of this module.  I have started on a couple of mock ups for my web app that will be added into the proposal.  I think that I have decided to focus entirely on creating my app in the portrait orientation as opposed to one for both portrait and landscape, although i will make the app available for use in landscape too, but I will not be coding for both orientations.

So now I’m going to head off to see Doomriders play in London tonight, before coming back tomorrow and finishing off assignment one.

Happy Halloween.

Draft Project Proposal

The Challenge


The aim is to create a new media product using trends within the industry.


My Chosen Subject Area


Flash is an area that I am interested in. With the takeover of Adobe, Flash is advancing and becoming more commonly used. I have gained basic Flash skills in prerequisite modules and hope to expand on my Flash skills. It is a goal of mine to learn more about the scripting language for Flash, by learning ActionScript I can take the Flash skills that I already have and develop them for further use.


My Project


I have chosen to create an interactive CD-ROM using Flash. I will be creating a Portfolio that will display the work that I have done, information, my CV and contact information.


Objectives


Technical


To meet my technical objectives to develop my Flash skills I have to find out more about Flash intermediate and advance skills and learn the scripting language ActionScript. I have began to try and meet my objectives by reading about ActionScript and build upon the ground work that I already have by completing online tutorials and understanding the technical process of creating a project using Flash.


I will aim to gain skills in these areas of Flash and ActionScript:


Loops

If statements

Scrolling

Mouse controls and events

Assigning attributes


With the skills that I will gain I will be creating a platform to showcase my work to potential employees on an interactive CD-ROM. I hope for the CD-ROM to not just show my work but show those who view it my potential and the skills that I have.


Professional


The professional objectives that I aim to gain tie in with my technical objectives. I aim to gain Flash and ActionScript Technical skills to make me a more desirable candidate for employment. I feel Flash is a key skill to have and by gaining these advance skills I feel that I will be more prepare for the professional new media industry. Being a young professional within the industry can be very competitive, this is my reasoning for creating a CD-ROM portfolio, as many people have online portfolio’s, I feel that if a potential employee had one in the physical form it could grab their attention. The CD-ROM is also a piece of work to show to a potential employee in itself. It’s not just the content but the platform that I use that can impress and show my work at a professional standard.

Flash Workshop

Mouse Control using Flash


I have been looking into mouse controls and how they can be applied to a gallery and be used for interactivity in my project. I have put together this workshop to create a scrolling image bar that uses mouse controls.


Scrolling Image Bar Workshop


1.  Open up a new document and change size properties to 600px height and 400px width. Also change the frame rate to 15 frames per second and you can also change the background colour if you wish to.

2.  Add the ten thumbnails that are 100px by 100px into the library.

3.  Drag all ten images from the library onto the stage.

4.  As you can see they are all piled on top of each. Separate them by dragging them elsewhere on the stage.

5.  Choose one of the images and set the x axis to 0. Select another image and set the x axis to 900.

6.  Now we want to align all the images so they sit next to each other horizontally. We will do this by selecting all the images and bring up the align pallet. Then press the button align top edge and space evenly horizontally. You should see that all your images are now aligned.

7.  The next step is to convert each thumbnail image into a button. Select the first image and press F8. This will bring up a window. In this window you need to change the name to bn_1 and select the option button, then press ok. Now repeat this step for each image but increasing the button number by one each time. So your second button will be bn_2.

8.  Select all the buttons that you have created and convert them into a movieclip. This is done by pressing F8. Call them imgbar_1 and select the option movie clip.

9.  Then select the movie clip and press F8 again as we need to create another movieclip. Call it imgbar and select movieclip option. Now we have a ten button that are within a movie clip which is also within a movieclip.

10.  Go into imgbar by double clicking, and then into imgbar_1 by double clicking. Here we have our ten buttons. The next step is to change the over state for each button. Double click on the first button and create a key frame (F6) on the over state. Copy and paste in place the image from the up state into the over state and change its alpha properties to 50% in the over state.

11.  Now repeat step 10 for each button. When you have finished test your movie by pressing ctrl + enter, to see if your rollovers work.

12.  Come back onto your main stage and go into imgbar (the first movieclip).

13.  Create a new layer and hold alt while dragging the key fame from the first layer into the second layer. This will duplicate the movieclip, select frame one in layer two and set the x axis of the movieclip on stage to 100. This will put them side by side. Now select both frames and drag them to frames100 while pressing down the alt key.

14.   Select the frames at 100 on the timeline and select both moveclips on the stage and change the x axis to -100.

15.  Select both layers on the timeline and right click and select create motion tween.

16.  Now select the whole motion tween (both layers) and duplicate by holding down alt and make the last frame end on frame 200.

17.  Now create a new layer and name it actions.

18.  On frame one insert a keyframe and  in the actions layer add the ActionScript below in the actions palette.

gotoAndPlay (101);


19.  Now go to frame 200, add a new keyframe and put the same code on actions layer.

20.  Go back to scene 1 and select the moveclip. Set the x axis to 0, the y axis to 300 and give it an instance name (bar).

21.  Create a new layer called actions and open the actions palette.

22.  Enter the following code:


root.onEnterFrame = function () {

if (_root. xmouse <50) {

bar.prevFrame();

bar.prevFrame();

}

if (_root. xmouse >550) {

bar.nextFrame();

bar.nextFrame();

}


}


This is giving the tween bar mouse controls. So if the mouse is less the 50 on the x axis then the bar will move to the previous frame and the opposite for the right side.


23.  Now we are going to add to the code:


root.onEnterFrame = function () {

if (_root. ymouse<301){

var=false;

}

if (_root. ymouse>300){

var=true;

}

if (_root. xmouse <50 and var= =true) {

bar.prevFrame();

bar.prevFrame();

}

if (_root. xmouse >550 and var= =true) {

bar.nextFrame();

bar.nextFrame();

}


}


Here we have added variables to help with mouse controls on the y axis.


24.  Now when the mouse is not over the image bar it stops moving. We don’t want this to happen so we are going to add this extra code:


root.onEnterFrame = function () {

if (_root. ymouse<301){

var=false;

}

if (_root. ymouse>300){

var=true;

}

if (_root. xmouse <50 and var= =true) {

bar.prevFrame();

bar.prevFrame();

} else {

bar.Play ();

}

if (_root. xmouse >550 and var= =true) {

bar.nextFrame();

bar.nextFrame();

} else {

bar.Play ();

}


}


25.  Lastly we want the bar to stop scrolling when you rollover an image. Here is some more code we need to add to enable this to happen:


root.onEnterFrame = function () {

if (_root. ymouse<301){

var=false;

}

if (_root. ymouse>300){

var=true;

}

if (_root. xmouse <50 and var= =true) {

bar.prevFrame();

bar.prevFrame();

} else {

bar.Play ();

}

if (_root. xmouse >550 and var= =true) {

bar.nextFrame();

bar.nextFrame();

} else {

bar.Play ();

}

if (_root. xmouse >50 and _root. xmouse <550 and var = = true) {

bar.stop();

}

}


You should now have a scrolling image bar!

Proposal: Portfolio for Local Artist, Jonathan Kelham

I plan to work towards a portfolio site for a local artist named Jonathan Kelham who is a third year Fine Art student in Birmingham. The client needs a website to display a selection of his work including images, videos, a biography, contact page and blog. The blog will be the main part of the project as I will be building it from scratch using Ruby on Rails.

The blog will act like a sketchbook as Jonathan will be able to upload and write about his work in progress which will add more of a dynamic feel to the website. In general, when a website changes frequently, users will return to it more often which of course can only be a good thing. As an artist, he needs exposure in order to make a name for himself within the local art community. For him to have a digital presence would be of great benefit to him as he would be able to refer people to his website while networking amongst Birmingham’s creatives.

The blog will also have an administration feature where he will be able to upload his own material and manage the content of his blog in a simple but functional manner.

The gallery section of the website will be a fairly simple setup, perhaps with some enhanced viewing techniques that give the section more of a tangible feel. Specifically I am speaking about gallery effects; smooth transitions and pleasing enlargements. The gallery will most likely be built again using Ruby on Rails. Works will be organised by medium.

The look and feel of the website will be quite minimal, but reflective of Jonathan’s work which features a fair amount of white space and natural colour. We have discussed giving the website the feel of paper media without being excessive in use of texture and shadow. Subtlety and understatement is key.

 I have chosen to use Ruby on Rails mainly because I have been won over by the testimonials from designers and developers who have migrated from the use of PHP in favour of this relatively new framework. Emphasis has been on speed, consistency, manageability and intelligible coding methods.

Say Hello to Ruby on Rails

I am writing this tutorial with the assumption that you have already installed Ruby on Rails on your computer. Installing Ruby on Rails isn’t exactly the easiest process if you are inexperienced with command-line interfaces, like I am, but I found Lynda’s Essential Ruby on Rails Training to be a huge help.

Before we get started with the Hello World app, you need to install a text editor such as E Text Editor which is available from http://www.e-texteditor.com/ This is just a good tool for editing web pages and great for working with Ruby on Rails. If you’re on a Mac, TextMate is the original inspiration for this program.

Step 1:

First of all you’re going to need to launch Command Prompt from Start > Programs > Accessories > Command Prompt.

Once you have Command Prompt open, navigate to your Ruby on Rails directory (most likely to be C:\Ruby unless you specified otherwise during installation) by typing:

cd c:\ruby

OK, so if your screen command prompt now starts with “C:\Ruby” we can now move on to creating the project.

To create your first project (or any new project for that matter) you need to alter your command line to read:

C:\Ruby rails my_app

This will tell Rails to create a new set of project files as below:
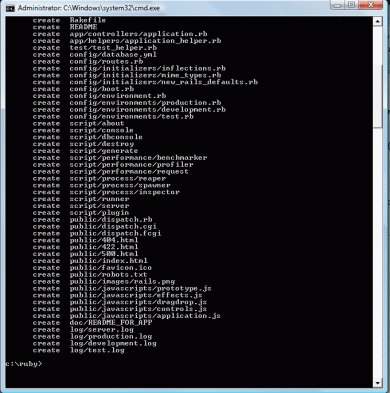
Rails has now created a series of directories and files in your Ruby directory that will be the basis for your application.

Step 2:

The next step is to launch our server. Currently, the web server that ships with Rails is Mongrel.

What we’re going to do now is run a script. You can view the scripts in your project by going to C:\Ruby\my_app\Scripts but as you might guess, the one we are concerned with at the moment is ‘Server’.

To start the server we need to first go to our project directory by typing:

cd my_app

Now we’re in our project folder we can run our server by typing:

ruby script/server

If you see something like the screen adobe, your web server should be up and running. However, just to test this, we need to open our browser and enter:

http://localhost:3000

Hopefully you should see a page like the one below:
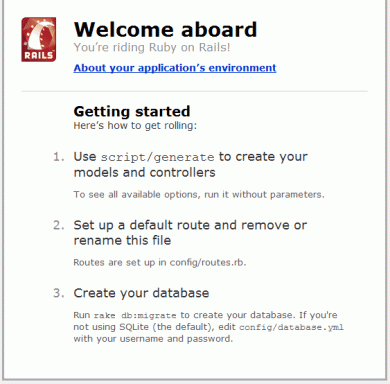
If not, just go back and make sure you followed the previous steps correctly.

Step 3:

So, working from the project we generated earlier on in step 1, we are now going to create a controller. The controller is what will be responsible for the actions we request from our application.

To generate a controller, all we need to do is run another script from our scripts directory that we saw earlier. To do this, open another Command Prompt window so as not to interrupt the web server we already have running. Make sure you are in our project folder and alter the command line to read:

C:\Ruby\my_app\ruby script\generate controller Say

If you did this correctly, you should see the following:

What we are doing here is telling RUBY to use the script GENERATE to generate a CONTROLLER called “Say”. As you can see, the script has also created other files, but we’ll worry about those later.

Step 4:

Once we’ve created the controller, we now need to open-up E Text Editor. We can do this from the command line by adding the following line to c:\ruby\my_app in Command Prompt:

e app\controllers\say_controller.rb

You should now see the contents of say_controller.rb in E, and we can go on to edit this to serve some kind of function:

After adding

def hello
end

We can go on to add a VIEW to this controller. A view is exactly what you might think it is. It is the front end of what the user will see and interact with. So what we are going to do now is create a view that we can display in a browser.

The GENERATE script has already created a folder for us within VIEWS, so all we need to do is create the RHTML file. This particular extension is practically the same as HTML, but the ‘R’ at the beginning of the extension implies that the file will include some elements of Ruby on Rails.

The extension .rb as you might guess belongs to Ruby. It implies that the content of the file is PURE Ruby, whereas files such as RHTML only include SOME Ruby.

Click the new file button in the lower-right of your E window and name the file hello.rhtml
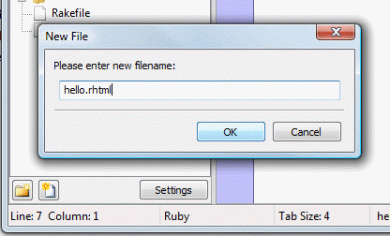
We can now edit this view file as we would a normal HTML file. Enter the following (or something similar) into your currently blank hello.rhtml file:

<html>

                <head>

                                <title>Hello World</title>

                </head>

                <body>

                                <p>Hello World!</p>

                </body>

</html>

…and save it.

Now, before we try and view it in our browser we need to restart Mongrel (our web server) by returning to the first Command Prompt window that is running the server and pressing Ctrl+C and then re-launching the server by entering:

ruby script\server

This is necessary in this case to let us view the changes we have made.

Now we can open our browser and go to the address:

http://localhost:3000/say/hello

You should be seeing ‘Hello world!’ in your browser window.

Conclusion

This was a starting block on your way to learning Ruby on Rails and up to now you have learnt how to make a static web page. Of course, RoR is not just for making static web pages, but web applications. This was just a very basic introduction to the framework.

Use CSS to Style Columns

So why would you want to style your list items as columns? Well, good question! Let me just give you a few examples: If you like me are designing a layout for a WordPress blog that has a LOT of categories, you might not want that list to go way off your page. Other blogs might have the same problem with their blogroll, your blogroll grow over time and at some point it will get longer than you might like and split it up in two columns.

But the same technique that is used in this example can also be applied to navigation. You can use this method to create a horizontal navigation bar, and if you have many links, you can have the links align nicely underneath each other.

OK, you probably want to get going, it’s very simple and easy. Actually we are only really using a few basic CSS properties and I will go over them in detail in this article.

Just an aside here before you start coding your CSS; a good practice before you start coding is to reset all the known default browser style. These differ a lot from IE6/7 to Firefox to Opera, Safari etc. Eric Meyer has taken the time to develop a stylesheet that will do just that for you, just grab a copy of the file, and use the ‘@import’ command at the begging of your CSS stylesheet to import the file.

Let’s start out with our markup then, a simple list you can get here. It’s just a simple list of the categories on this site.

  1. First thing we want to do is set a width of our container and centre it. You don’t have to if you are doing this in your sidebar, just set the width.
  2. #categories {
    width: 980px;
    margin: 10px auto 0;
    }

  3. Next thing is to set the list-item elements to actually make the colums. We float each single list item that will make every category ‘jump’ up to the right of its preceder. We will also give it a width of 136px (this is essentially the width of the coloumn), and push the columns a bit apart by giving them a right matgin of 3px.
  4. #categories li {
    float: left;
    width: 136px;
    margin-right: 3px;
    }

Well that’s basically it, we now have a set of columns, but to make them visually appear better we will do some extra styling.

  1. Give the line a height of 1.7em
  2. #categories ul {
    line-height: 1.7em;
    padding:0 0 0 5px;
    }

  3. Make the font a bit smaller, capitalize the words and make it bold.
  4. #categories li {
    font-size:11px;
    text-transform: capitalize;
    font-weight: bold;
    }

  5. Finally style the links and give them a hover style.
  6. #categories li a {
    color: #000;
    text-decoration: none;
    }
    #categories li a:hover {
    color: #999;
    text-decoration: none;
    }

You can suit the final styling to your individual needs; you can also make the columns wider or narrower if that’s what you want. If you are making it in a sidebar you will probably only want to have 2 columns, if you are styling a navigation bar, you might want to have more.

If you are interested you can download the full stylesheet and compare it to your own.

/Kasper – on Twitter and Delicious

Draft Proposal

For the second part of this assignment I proposal to create a web application for iPhone.  This application will be based on the website Dead Format.  DF is a website that caters for fans of alternative music who primarily collect their favourite genres of music on the vinyl record as opposed to CD or digital downloads.  It covers aspects of record collecting such as pressing information, where collectors can find out how many copies of a certain record were pressed and on what colour vinyl, what record label etc.  The biggest part of the site is its Trade List facility.  This allows people to register on the site, and then they can upload lists of the records they own and the records they want, and other members can browse peoples lists with the view to trading and buying or selling records with users.  As well as these two features the site also features news, features, contests, a forum and a web store.

I will be focusing on 3 main aspects of the site for the creation of my web app.  These 3 aspects will be Trade Lists, Pressing Information and News.  It would prove too big a task to complete in 12 weeks if I were to design a web app for every aspect of the website.  For the web app I will not be redesigning the site completely, I will be taking the information that is already available on the full version of the website and adapting it and making it available for iPhone in a more user-friendly manner.  Although the iPhone does have a built-in browser capable of displaying full websites it can often take a while to display these sites and load them fully if the user doesn’t have a fairly strong mobile signal and 3G coverage.  Therefore I am going to make good use of RSS feeds to deliver the 3 aspects that are named about and make them available in a truncated form of an iPhone specific web app.  The layout will be designed specifically for the iPhone, although other mobile web browsers will be able to access the site, the layout and dimensions will be specific to the display of the iPhone.

So therefore I will be using my knowledge of developing webpages for iPhone, and will be bringing in aspects of HTML, CSS, RSS Feeds & also my knowledge of using Photoshop, Fireworks and Dreamweaver, as well as an Apple iPhone specific program called Dashcode, which can be used to create web apps for iPhone.  This comes with a handy iPhone Simulator program, which will allow me to use and debug my application on my computer whilst using this program, which acts like an iPhone.  I will also be uploading my web app and asking friends that I have who also own iPhones, which will allow me to find out any serious problems that need addressing before allowing the application to not only be submitted for my assignment, but also going live and making it available for all users of Dead Format who own mobile phones capable of accessing the site.

Draft Proposal

My project for this module shall consist of various new areas that will demonstrate an enhanced learning of my personal design skills and capabilities. As previously discussed, I wish to draw upon trends in the new media industries and the skills required by potential employers, therefore creating an original and creative project that will benefit future design I complete.

My idea, although not entirely original, consists of the production of a website that revolves around hot topics of music culture, specifically looking within sub-cultures of urban and electronic dance music. I intend to create the website through the use of Adobe Photoshop Elements, Macromedia Fireworks and Dreamweaver MX, using HTML and PHP as my style of editing codes. I intend to incorporate a sufficient use of media content, in particular a high ratio of images, thus enhancing the visual presentation of my site, avoiding the plain and boring elements that a heavy text page can display.

I feel my main technical objective here will be the combination of HTML and PHP, as discussed above. I have researched how it is possible to incorporate PHP into a HTML document, a simple yet effective tool in creating effective and dynamic web pages. By researching appropriate literature regarding how to use and understand PHP, I demonstrate a keen desire in obtaining my personal and technical objectives. After a sufficient understanding has been met, I will look at creating tables, (through the use of combined coding) in which to display my content. Whilst creating my site, I wish to develop my technical skills in coding, using comments in my PHP codes to my advantage. A code that seems clear at the time of design can often cause confusion at a later date, an aspect I have experienced in my previous designs. Therefore, seeing as PHP ignores any text comments in a script, I will consider applying occasional memos in-order to make my codes more readable. This area refers to how I wish to develop my professional objectives in terms of web and new media design, as I shall be learning new programming techniques in regards to PHP and its language.

I also wish to incorporate the use of RSS feeds into my site, thus allowing a frequent update of content made accessible to users visiting the site. Content may be taken directly from other sources, thus creating an online archive of recent news and events within music culture. In other words, the main objective for my website is to display a collection of news and media associated content under one address, allowing readers to find all the information they need on one site. This will take a significant amount of research into other competitors who provide reliable and interesting information on the topics I wish to discuss. I shall conduct detailed analyses of existing websites, studying the type of news articles and media content they each provide, thus gaining an overall perspective of what is most appealing to a market. This draws upon past research methods I have conducted, specifically secondary techniques that lead to a well researched and valuable new media project.

Site Map Example:

site-map

Wireframe Example:

wireframe2

Another reason to go Mac.

After some further research on PHP, I discovered that Mac OS X comes with Apache server as standard and enabling it is as simple as checking the box next to ‘Personal Web Sharing’ in the ‘Sharing’ section of System Preferences. Once you have done this you can place files in /Library/WebServer/Documents to access them on your server. I also learnt that Mac OS X does come with PHP, however the installation lacks any significant quantity of extensions, so it’s still worth downloading the complete XAMPP package I have previously discussed.

Installing MySQL on Mac OS X

The following information provides detailed instructions on installing a mulit-software package that incorporates the following necessary requirements; Apache, MySQL, PHP, phpMyAdmin, and more.

Taken directly from: http://www.keitr.com

1. Go to http://sourceforge.net/project/showfiles.php?group_id=61776. Choose “XAMPP Mac OS X”.

2. Choose to download xampp-macosx-0.7.1.dmg.

3.  Double-click the Disk Image file you just downloaded.

4. In the window that opens, double-click XAMPP for MacOS X.pkg.

5. Once installation completes, go to your Applications folder, and go inside the xampp folder inside.

6. Double-click on XAMPP Control Panel. This tool lets you start and stop the various servers installed as part of XAMPP.

7. Start Apache and MySQL by clicking on the “Start” buttons next to each item. Note that you will need to repeat these steps if you reboot your computer and wish to use Apache and/or MySQL.

8. Go to http://localhost/. If you are directed to a page with the XAMPP logo, your installation was successful.

You can add or change the files in /Applications/xampp/htdocs to change what you see at http://localhost/ on any local web browser.

Here are the locations of some configuration and log files you may want to view or change:

Type    Location
Apache configuration    /Applications/xampp/etc/httpd.conf,
/Applications/xampp/etc/*.conf
Apache logs    /Applications/xampp/xamppfiles/logs/access_log,
/Applications/xampp/xamppfiles/logs/error_log
PHP configuration    /Applications/xampp/etc/php.ini
MySQL configuration    /Applications/xampp/etc/my.cnf

« Previous entries